
How To Make 24-Hour Yogurt At Home With Goat’s Milk (Step-By-Step With Pictures)
I’ve blogged before about how important I think Specific Carbohydrate Diet Yogurt (AKA 24-hour yogurt) can be for healing. You can read about exactly why I think everyone should at least try 24-Hour yogurt.
But, the truth is when I got started with SCD and 24-hour yogurt the whole idea was overwhelming. Not only did I think store bought yogurt was perfectly fine (it’s not); I had never made any fermented foods (should be easy, right?). A couple of burnt pots of milk, a batch of lumpy yogurt and I was up and running.
As time went on, I picked up some time-saving pieces of the puzzle from readers of the blog and other places. Now, before I go any further just a word of caution, Jordan and I do not recommend trying dairy until you’ve been on the SCD diet at least 30 days (it’s one of the 4 horseman!).
The “Old Way” I Made 24-Hour Yogurt
When we started SCD Lifestyle, there was no one best way to make gut-healing 24-hour yogurt.
Commercial yogurt makers are too hot to make proper 24-hour yogurt (the ideal temperature is 100-110° F). Not kidding, when Jordan and I started following SCD years ago, we used a regular yogurt maker with a dimmer switch to keep the temperature cooler!
I hope that tells you how important real 24-hour yogurt is – we were willing to “Frankenstein” a yogurt maker to get it!
Other methods include a slow cooker (again, often too hot or too cold), or incubating the yogurt with a heating pad (very finicky).
Essentially, no matter what method you chose, making the yogurt required 24 hours of babysitting, and more often than not the yogurt didn’t turn out right because of fluctuations in temperature.
Luckily for all of us, a lot has changed in the last 8 years. “Gut health” has gone from fringe topic to a mainstream health concern. That means products that make living a healthy gut lifestyle are WAY more readily available.
That’s where the new Luvele SCD- and GAPS-approved 24-hour yogurt maker comes in.
This is the very first yogurt maker specially designed for making healthy gut 24-hour yogurt.
We’re making the Luvele yogurt maker our “official recommendation” for healthy gut 24-hour yogurt. And today we’re going to walk you through exactly how to make healthy gut yogurt at home, using the Luvele.
Picking The Right Milk
Before we dig in to how to make the yogurt, I want to explain why we are using goat’s milk and how to choose the right milk for you.
You can use regular dairy milk, goat’s milk, camel, sheep’s milk, almond milk, coconut milk, or other alternative milks, too.
For best results, use the highest quality milk you can get – raw, unpasteurized, organic milk is best. If you can’t access raw milk, pasteurized will still work.
If you’re using raw milk, you don’t need to heat it first before adding the yogurt starter. If you’re using pasteurized milk, make sure you do heat it before making yogurt (more on this in the directions below).
If you’re using almond, coconut, or another alternative milk, make sure to check the ingredients for artificial flavors, sweeteners, etc. I like to use homemade almond milk or canned, additive-free coconut milk.
If you’re using an alternative milk like almond or coconut, you will have to add a little sugar to the milk along with the yogurt starter. Don’t worry – the sugar isn’t for you to eat, it’s for the bacteria in your yogurt! By the end of the fermentation process the sugar will be gone. We cover that and how to adjust the fermentation time for nut milk in our eBook.
In the directions below, I’m using goat’s milk. We think starting with goat’s milk (or another non-dairy milk) is ideal. If you tolerate the goat’s milk yogurt, you can always “advance” to cow’s milk on your next batch.
And if you’re lactose intolerant or “allergic” to milk, it’s really important to read this next part. First, remember that an allergy and an intolerance are NOT the same thing. If you’ve been diagnosed with an allergy to cow’s milk, please don’t eat yogurt made with cow’s milk without first talking to your doctor.
However, if you’re lactose intolerant, you may find you can tolerate cow’s milk yogurt when other dairy products give you trouble. Why? Because during the unique 24-hour ferment process, the beneficial bacteria eat the lactose sugar. By the end of the 24-hour ferment, virtually no lactose remains in the milk (if fermented properly, like we’re about to show you how to do!).
(Even if you’re lactose intolerant, don’t use lactose-free milk to make the yogurt! The beneficial bacteria will take care of the lactose for you.)
Choosing The Right Yogurt Starter
Choosing the yogurt starter you use may be even MORE important than the milk you use.
You have a few different options. The easiest method is to purchase a freeze-dried yogurt starter. We recommend this one that is easy to find, or this one if you are strictly dairy-free.
You can also use yogurt as a starter to turn milk into new yogurt. To do this, you’ll add ½ cup of prepared yogurt to your fresh milk before fermenting. Over time, using the same yogurt will lead to less probiotics in your finished yogurt. For that reason, we prefer using a freeze-dried starter every time.
A final option is to use your probiotic capsules as a starter for the yogurt. You can just break the capsules open and sprinkle them into the milk before adding to the yogurt maker. But, it’s important to know that depending on what strains are in your probiotic, you may or may not create true “yogurt.” If you want yogurt, make sure the probiotic you use contains one of these strains:
- Lactobacillus bulgaricus
- Streptococcus thermophilus
- Lactobacillus acidophilus
- Or Bifidobacterium lactis
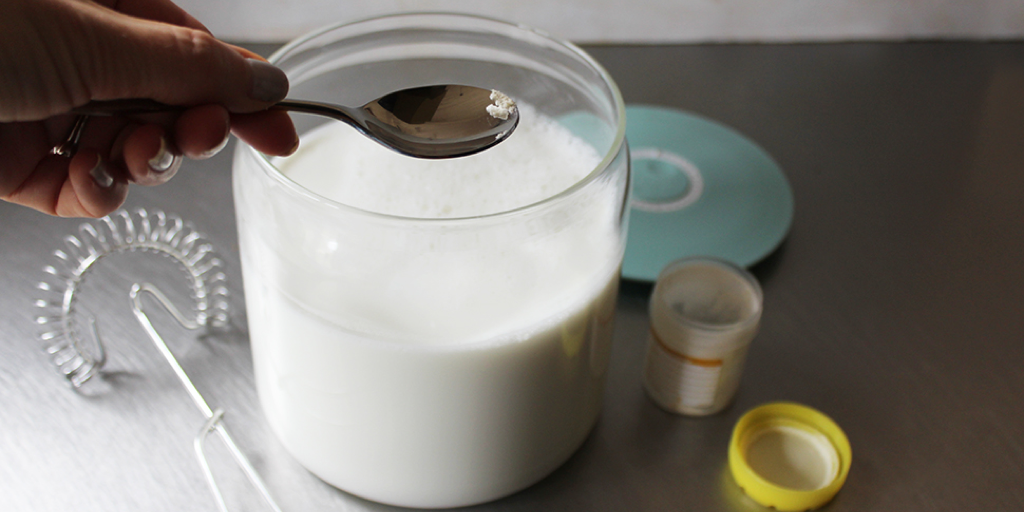
For most yogurt starters, we use 1/8 teaspoon per quart of milk. Always check the directions on your starter, as well. And know that more isn’t better. If you use too much starter, there won’t be enough “food” for all the bacteria and your yogurt won’t turn out.
If you use too much starter, your yogurt will be runny or slimy. If you don’t use enough, your yogurt will be more like milk than yogurt (not very tangy!) Generally, this yogurt is safe to eat, it just isn’t as beneficial.
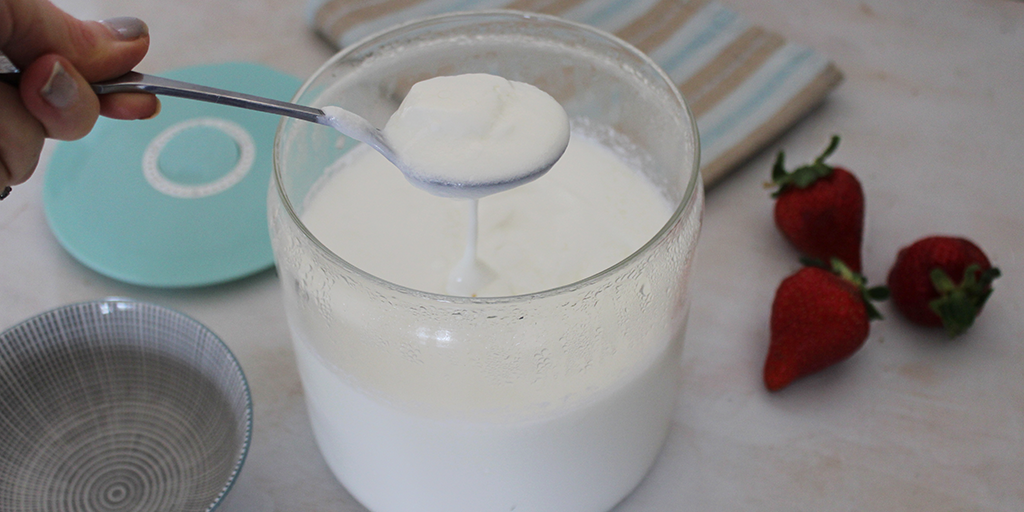
Thickening and Dripping Your Yogurt
24-hour yogurt – even when made perfectly – will be thinner and runnier than other yogurt you’ve had. This is because it doesn’t have added thickeners and because it hasn’t been “dripped.”
If you want thicker yogurt, the first option is to drip it. Dripping is what turns plain yogurt into “Greek yogurt.” It’s the process of removing the whey, which is liquid. Dripped yogurt is also higher in protein per serving than regular yogurt.
Dripping yogurt is really easy to do – just strain the yogurt through a cheesecloth. The excess whey (liquid) will drain away, leaving you with a thicker yogurt.
Another option is to add a thickener like gelatin to the milk before fermenting it. Since gelatin is beneficial for gut health, adding gelatin to 24-hour yogurt is a win-win.
To thicken your milk with gelatin, add 1 tablespoon of gelatin per 4 cups of milk before heating the milk.
Troubleshooting Your Yogurt
The 24-hour yogurt experience is one of trial and error. Most of us have never made yogurt at home before and when a yogurt batch doesn’t turn out right, it can be really frustrating. Don’t give up. If you’re struggling with making the yogurt, we highly recommend trying one of these yogurt makers. They have made yogurt-making almost effortless.
Some of the most common issues we have experienced making yogurt:
- You use too much or too little starter
- You burn the milk when you’re heating it (heat it slowly!)
- You put your yogurt maker where the temperature changes (in front of a window, next to the stove, etc.)
And if you react negatively to the yogurt?
- Introduce it VERY slowly – as little as ½ a teaspoon per day, slowly increasing.
- Don’t eat too much – 1 cup per day is the most we recommend.
- Can’t tell if you’re reacting to the milk or the starter? Try freezing a small amount of the yogurt and then consuming it. Freezing will kill off the beneficial bacteria. If you still react to the frozen yogurt, you’re probably not tolerating the milk you used.
Enjoy and remember at around 700 billion CFUs of probiotics per cup this stuff can work wonders!
How To Make Goat’s Milk 24-Hour Yogurt
Ingredients:
- 2 quarts goat’s milk
- Yogurt starter of choice (see above)
- Yogurt maker
Directions:
(Note: If you’re using raw, unpasteurized milk, you can skip heating the milk and to Step 4).
1 – Pour 2 quarts (or amount of milk that fills your yogurt maker) into a clean saucepan
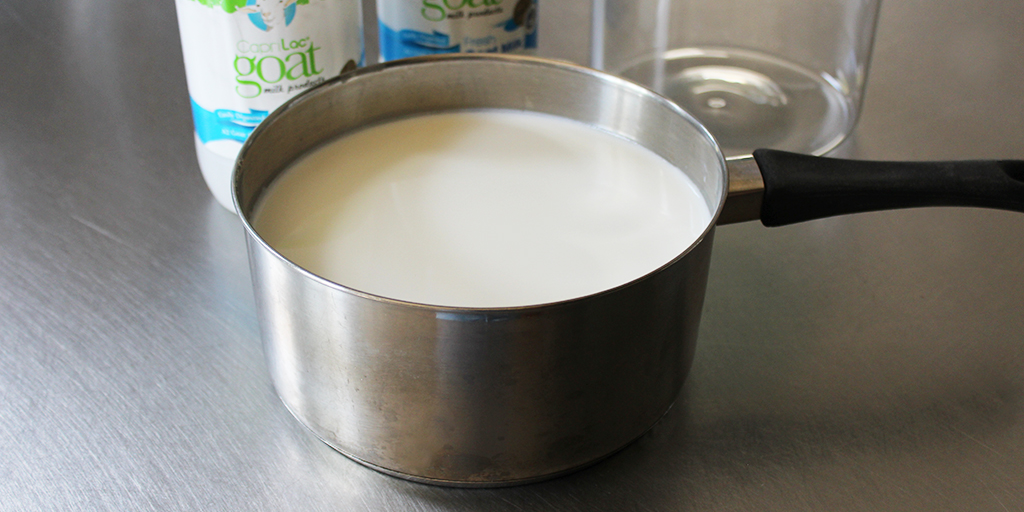
2 – Over LOW heat, slowly heat goat’s milk to 180°F. It’s really important that you don’t let the milk boil or burn. Be patient at this step and don’t crank the heat too high.
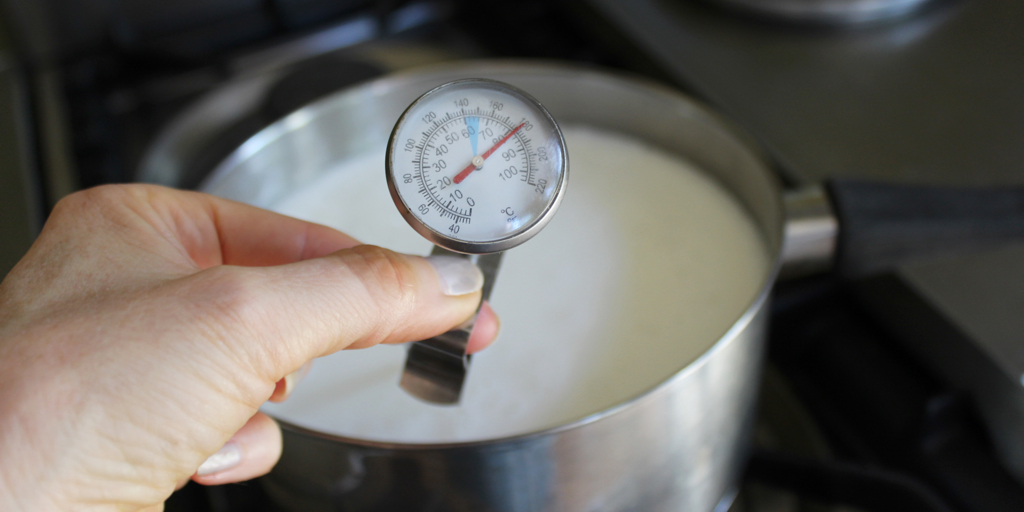
3 – Turn the heat off, cover the milk, and let it cool back down to around 100°F.

4 – A “skin” will have formed over the top of the milk as it cooled. Use a spoon to remove this skin and discard.
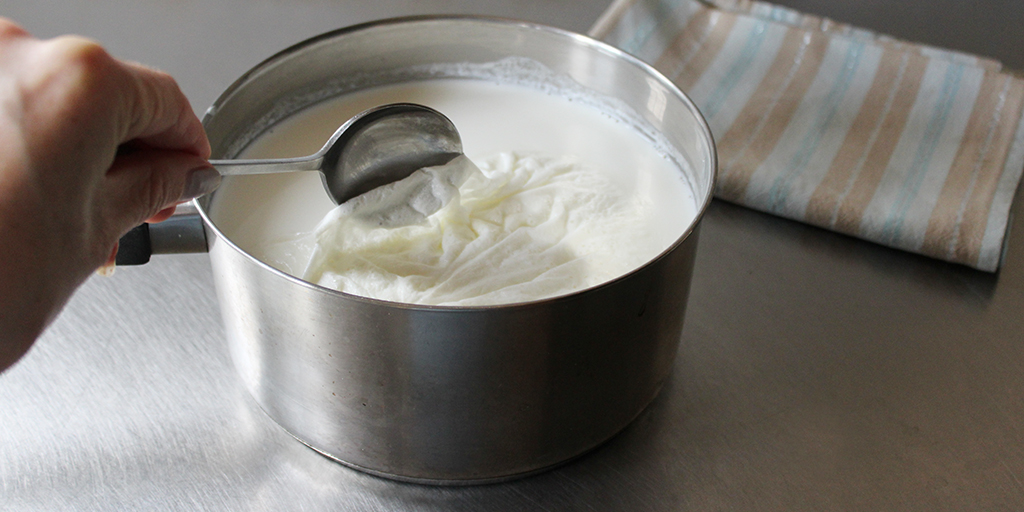
5 – Pour the milk into your yogurt maker. Then add in your yogurt starter and whisk gently to combine. It’s now time to start fermenting!
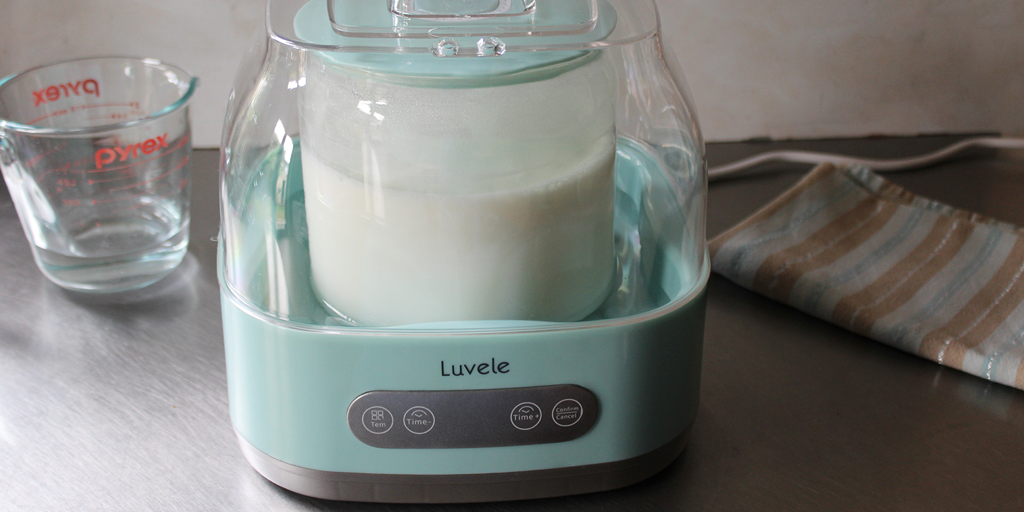
6 – Place the lid on the yogurt and put inside the yogurt maker. Add water to the fill line.

7 – Put the cover on your yogurt maker and set the temperature to 100°F and the time to 24 hours.
8 – When 24 hours have passed, your yogurt is done fermenting. It will be warm and runny, though – and isn’t quite ready to eat. The probiotics still need to set. Carefully remove the yogurt container from the maker and place in the fridge. Don’t stir, mix, or shake. Let cool for at least six hours.
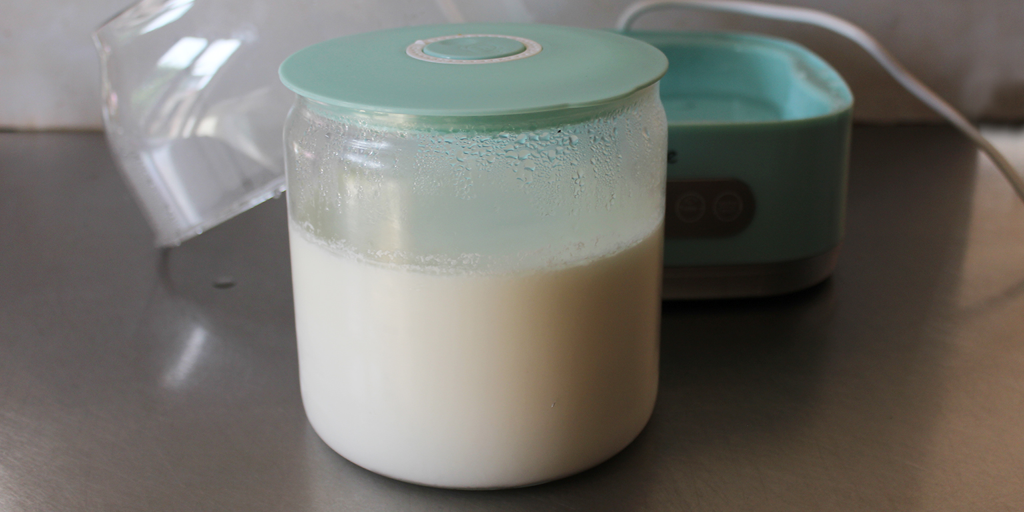
9 – After the yogurt has cooled for 6 hours, it’s ready to eat! It will keep for 1-2 weeks in the refrigerator. You can drip or thicken the yogurt if you prefer (see above).
I hope this recipe helps you get started making your own 24-hour yogurt. And if you’re on the fence about trying it, we highly recommend getting a yogurt maker from Luvele. This is the only yogurt maker specifically designed to make powerful 24-hour yogurt, and it truly makes the process easy.
– Steve
P.S. Leave a comment and tell us your favorite way to enjoy 24-hour yogurt.
Did You Like this Article?
Subscribe to our newsletter to receive email notifications, some ways to find relief, and next steps.