
How to Make Sauerkraut – The Fast and Easy Way
The beneficial effects of SCD probiotics are well documented. Typically, the 24-hour fermented yogurt can help restore healthy gut flora and improve your digestion…
Unless you can’t tolerate dairy products.
Dairy reactions seem to be a problem for our “Tough Case” readers. In that case, they try making 24-hour goat’s milk yogurt, but it usually triggers the same reaction. The casein protein is a common intolerance for people with Leaky Gut Syndrome.
But there’s still hope for getting probiotics in your life…
You can either take them in pill form, which is OK but the best place to get good bugs is straight from a food source, like raw unpasteurized sauerkraut. Remember: store bought sauerkraut is usually pasteurized, meaning they heat it up to kill the germs… which also kills the good bugs we’re trying to eat.
In this post, I’m going to show you how to easily ferment raw sauerkraut without using any special contraptions…
Simple Sauerkraut Step 1:
You’ll need one head of cabbage, a heavy knife, sea salt, a glass bowl, a Ziploc® baggy, and another bowl small enough to fit inside the opening of the glass bowl.

Simple Sauerkraut Step 2:
Cut the stem off the cabbage. Then, take the head and slice it in half so that you can see the area of the stem that’s left inside the head. Make a V-cut into each half to remove the stem on each side.

Simple Sauerkraut Step 3:
Cut each side of the head in half so you’re left with four quarters. Then, take the 1st quarter and chop it into tiny slivers. Some people have really cool choppers to get the job done, but I just use my heavy knife and some elbow grease…

Simple Sauerkraut Step 4:
Take the 1st quarter of the cabbage you finely chopped up and drop it into your glass container… but here’s the trick… add the shredded cabbage in a handful at a time, sprinkling sea salt on each handful after you drop it in.
Next, go through the other 3 quarters and do the same process until the entire head is chopped and in the glass container with salt gently applied to each handful.

Simple Sauerkraut Step 5:
Once you’re all finished with step 4, your glass container should look something like this picture. Sprinkle a little more salt on top. FYI – the reason we’re adding salt is that it will help draw the moisture out of the cabbage (to help us later when we need the juice)…

Simple Sauerkraut Step 6:
Take a few minutes to use your fist (or a meat hammer – but be careful not to break stuff) to pound on the shredded cabbage in the glass container to begin the process of compacting it. Once it’s packed down a bit, sprinkle a little more salt on it and let it sit for 2-3 hours.
Over the next 2-3 hours the salt will keep drawing the moisture out, so stop by every so often and pack it down more, forcing more of the moisture out. Come back in about 2-3 hours for the next steps 🙂

Simple Sauerkraut Step 7:
Hopefully your shredded cabbage is filled with juice by now. It’s called the “brine.” If not, sometimes I have to actually use both hands and “kneed” the shredded cabbage depending on how ripe it was when I started making it.
Here’s how to tell when it’s ready… if you push down on the cabbage with your hand, the brine water should rise past the level of the cabbage, as in this picture:

Simple Sauerkraut Step 8:
This is where you build the “Super Sophisticated Sauerkraut Contraption 5000 (TM).”
Take the smaller bowl, which is small enough to fit inside the glass bowl, and set it on top of the sauerkraut. Then, take the Ziploc® baggy and fill it with room temperature water. Set the bag on top of the small bowl… and wallah – it’s done!
The point of this whole thing is to keep weight on the bowl so the shredded cabbage stays submerged in the brine water. If it’s not enough weight to keep the shredded cabbage below the brine water yet, just stop by every couple hours and push down on the smaller bowl to keep compacting the shredded cabbage even more 🙂
NOTE: Don’t ever just add regular water to this. If you absolutely have to add water to it to fill it up, then get some filtered water and mix sea salt in it first, then add it. If you still have an old batch in the fridge, add a bit of that brine as a “starter culture” and it will kick it off with some good bugs right off the bat.

Simple Sauerkraut Step 9:
This is the final step, and this picture is a visual aid for you to see what the brine water level should look like before you “set it and forget it.”
If it’s ready to go just set it aside somewhere away from too much heat or too much cold. Room temperature is the best. I’ve heard mixed reports about covering it from light and I’m not sure what the difference is, so I still throw a towel over it to keep it in the dark anyways.
How long it will take to ferment depends on the temperature of the room it’s in. I usually start tasting mine around day 5 to see where it’s at, but 7 days is typically the best length of time for me when my house stays around 72°F.

Simple Sauerkraut Step 10:
When you come back to it 5-7 days later, you might find a few pieces of shredded cabbage on top that were exposed to the air and appear moldy. Don’t panic 🙂 It looks like this:

Just use a spoon and skim that part off into the trash. Anything that was below the brine is healthy and chocked full of good gut bugs.

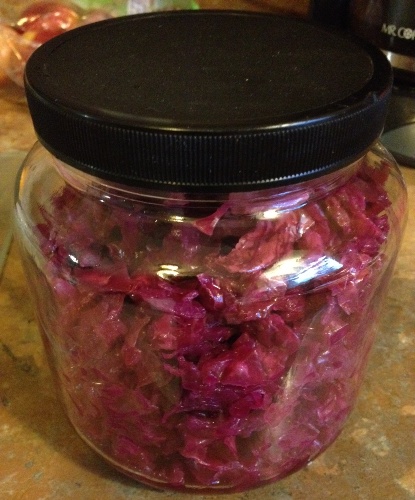
Simple Sauerkraut Step 11:
Once it’s ready, move it to some kind of glass container and set it in the fridge. Enjoy a few tablespoons 15-mins before a meal to increase stomach acid production 🙂
It has wonderful probiotic effects, especially if you can’t tolerate dairy and don’t eat the 24-hour yogurt. If you’re sensitive to good bugs it might be a good idea to start with 1/2 tablespoon each day and work your way up slowly.
NOTE: The point of this post was to show you how to make sauerkraut using stuff you may already have in your kitchen. Patrick on Facebook told me about this Picklemeister, which is a cool contraption that makes it easier to ferment sauerkraut by letting gas out of the jar, but not allowing fresh oxygen in.
Enjoy!

P.S. – Leave any cool modifications you try in the comments below. Experiment away!
Did You Like this Article?
Subscribe to our newsletter to receive email notifications, some ways to find relief, and next steps.